
 My House and Home Furniture DIY Project: Clipboard Art
Wednesday, 23 May 2012
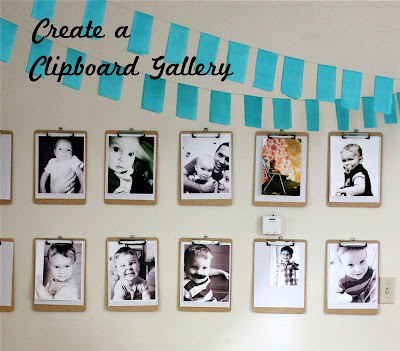
Here is our second DIY My House and Home Furniture project: I just came across this amazing and super affordable clipboard DIY project that you guys will absolutely love to add to your collection of home decor. All you need are several clipboards from an office supplies store, hangers from an arts & crafts store, and printed photos 8.5′ x11′ of your favorite moments with your loved ones or just colorful beautiful photos of anything, or just paintings that your kids made for you. This idea is so versatile, as you can change it by just printing new photos or changing new paintings from your kids.
You just need to add the hanger on the back of each clipboard and you can use the 3M double-sided adhesive hooks that can be easily removed without making absolutely any damage to your walls. You can purchase those 3M hooks at your nearest Target store. Then place the clipboards anywhere on a wall and create your own pattern. I feel that these project looks great with several clipboards, like four to six would be perfect. Here are some pictures to give you pattern ideas:

DIY My House and Home Furniture Project – Frame Collage
Making your own frame collage was never easier and cheaper – this is our first DIY My House and Home Furniture Project! So you have seen these all over the place and you will be surprised at how affordable and fast this project is. It will make your home look modern, cozy, and add your own touch to any room in your house. I really love how this collage looks like in a living room because it really makes an entrance statement.

Here is an easy guide on how to create your own frame collage:
Before starting, make sure you have the following:
- Picture frames.Stop by your nearest thrift shop and buy several frames, no matter how old and raggedy they look. I would say try to get 10-20 frames (can be picture, art, mirrors), depending on how large your wall is. Make sure that the glass is in good condition (i.e., no chipping and scratches) and if the frame is missing a back hanging piece, don’t worry, an arts and crafts store sells those little pieces for really cheap and they are really easy to install. NOTE: You can even opt for all circular frames without adding photos but this might take a lot more time scavenging for these frames without spending much.
- 1-2 cans of any bold color spray paint that complements your house and home furniture. For starters, you can use Painter’s Touch Ultra Cover Gloss in black, as these will go well in pretty much any room.
- Small nails to hang the frames. If you don’t want to make holes in your wall, you can use the 3M hooks available at Target that use easy to peel off double sided adhesive tape. I use these all the time and absolutely love them!
- Hammer (if you will use nails)
- Hooks to mount the frames, just in case if they are missing the hanging hooks.
After you have obtained the above, here are the easy steps to creating your frame collage:
- Start in an open space, where you can lay out each frame and play around with how you want them to be placed on any wall in your home. You can place horizontally, vertically, round mixed with square, or whatever way you want.
- Now that you have your layout planned, begin taking apart each frame and throw out old pictures inside. This is how you start prepping for spray painting so make sure you pull out the glass piece as well. Make sure you place the glass pieces back in the lay out you desire so that you don’t lose track of their placement and take out all the frames so that we have them ready for spray painting.
- Go outside in an open space that is well ventilated and have fun spray painting all of your frames! Make sure you wear gloves and are wearing clothes you don’t mind getting permanently stained. Make sure you let these frames dry well and you can take a break by continuing on step #4.
- Inspect the back of each frame and if the hook is damaged or missing, replace it with your extra ones that you have handy.
- Remove any flaps from the back of the frames to avoid adding bulkiness in the back.
- Clean each glass piece well with a glass cleaner (ammonia based to avoid streaks) and you can use alcohol, nail polish remover, or acetone to remove any sticky left over from stickers.
- Now that you have your layout and have decided which frames will stay, print your most favorite photos in sizes that match your frames and preferably choose a theme, like wedding day, travel, family, etc, etc… You can print them in black and white, sepia, or color. If you don’t want to add photos, you can keep the frames hollow! Just use the frames as a decoration for any room in your home.
- This is the most tedious part of all, installing the hooks/nailing the wall to properly place each frame. Make sure you allow for the space you intended. You might need somebody to help you with this process, but once you have all the nails/hooks in, you are done with the hardest part!
- Now that you have your frames dried, printed pictures ready, glass pieces cleaned, installed and inspected hanging hooks, removed unneeded back flaps, nails or hooks placed into the wall, you are finally ready to hang these babies up!
Now take a picture of it and send it to us to show off your new DIY project 
